Showing posts with label Robot without Microcontroller. Show all posts

Saturday, December 6, 2014

How to Make a Bristle bot

The title explains all , this post is about how to make  easy bristle bot without falling or rotating the same path without moving like an insect.

If you look other videos about making bristle bot at the end there are not much videos about real working because the bot either move some distance and fall or it moves in a predicted motion.

Yeah as you think the bristle bot is something easy to build, when we got the right components , what if we want to use the components that available readily to do it?

Yes still you can do it but it won't give you the expected result.

Here I've made a bristle bot which can be built less than 2 minutes. All you need is any *tooth brush, * vibrator, *button battery, *paper clips and a double sided tape and glue *LEDs to make it look cool compare to than other bristle bot.


This is how my bot was looked after I finished, Is it looking cool?? I love it when making it awaken the inner child in me.

Lets Make the bot,

Cut the head portion from your tooth brush (new one would be perfect for this )


add some glue to it and fix the vibrator


add the paper clips to the bot like it's getting wing


add battery and complete the bristle bot.


add the LED's to another battery like this. More the LEDs More the fun


cover the LEDs with double sided tape and place it over the vibrator

Number of attempts before this design


It looks like an insect , don't belive me? check it yourself


Thursday, December 4, 2014

Have you tired of building robots with numerous coding and difficult circuits? want to make a cool wireless robot without a microcontroller , here it is for you.

A robot that does not need any sort of programming or complex circuit to build, This is a complete beginner robot, anyone can do this without much knowledge about electronics, all you need is right components and right placement of these components.

This is a simplest Wireless robot without a need for microcontroller, this can be made with readily available components . No need to solder your electronics components and its cheap to do .

check the video below and learn How to do this robot.


check this page for circuit diagram, its simply plug and play type bot, No need for the circuit diagram,  if you still want circuit for this robot check this Here

Components Need to Make this

RF Transmitter and Receiver Module

L293D Motor Driver

Push button and connecting wires

2 batteries

2x Motor

2x wheels 1x castor wheel

1x chassis


See the video below and check its performance


Have you finished Making the robot??
Lets add a camera to that and control from other room.


The above video I've used my old android phone for cam, If you don't want to place your phone like that or you don't have an android you can go for a wireless camera that is available cheaper on many electronics market,

If you add a camera to this robot , it become a cool surveillance robot , which can be operated from a 120 feet away from this robot. The distance is shorter but this is really cool for a hobbyist and beginner to give a try. Make this robot to stalk your pets at home :).

For queries feel free to leave comments below . subscribe to my youtube channel for regular updates or do check my channel for really easy to do type bots


Sunday, November 2, 2014

A Light Following Robot Without Microcontroller


Required Components :

1x Castor Wheel
2x wheels
2x Gear Motors
1x LDR sensor
1x Chassis 
1x ULN2003 IC
1x  9v battery
1x battery snap
1x Breadboard and connecting wires
Spacers, stud, screws and screw driver

Circuit Diagram:


blue wire is for connecting sensors output.


LIGHT SENSOR:


LDR SENSOR CIRCUIT:
blue wire is sensor output
red wire is power supply (5v)
black wire is ground (-ve)

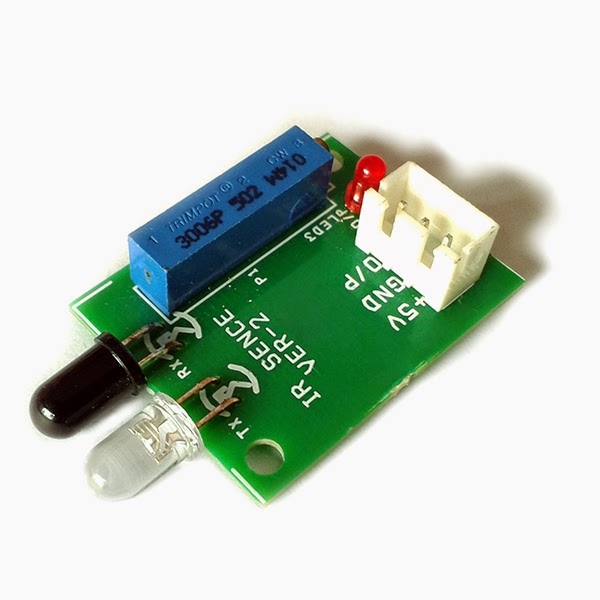
How to make a LIGHT Sensor From IR Sensor
Remove both the IR transmitter and Receiver, Place a LDR in the place of Receiver IR.

How This Light Following Robot Works?

Whenever the sensor detects Light, it gives 5v as logic output. The output of the sensor is connected to the ULN2003 IC input, This IC swich ON the circuit Whenever 5v is applied to the sensor input.


check the link for How to assemble components.. http://learnhowtomakerobot.blogspot.in/2014/11/a-simple-line-following-robot-without.html


This is a Fun to do robot. The robot start to move if the sensor detects flame, be cautious when using a lighter or other element using for flame.

Required Components :

1x Castor Wheel
2x wheels
2x Gear Motors
1x Flame sensor
1x Chassis 
1x ULN2003 IC
1x  9v battery
1x battery snap
1x Breadboard and connecting wires
Spacers, stud, screws and screw driver

Circuit Diagram

blue wire is for connecting sensors output.


Flame Sensor:


Flame Sensor Circuit:


blue wire is sensor output
red wire is power supply (5v)
black wire is ground (-ve)

How to make a Flame Sensor From IR Sensor


Remove the IR emitter by cutting out from the pcb. IR transmitter which usually marked as (Tx) in the sensor pcb. If the IR transmitter removed from the pcb, this sensor act as a flame detector.

How This Flame Following Robot Works?

Whenever the sensor detects flame, it gives 5v as logic output. The output of the sensor is connected to the ULN2003 IC input, This IC swich ON the circuit Whenever 5v is applied to the sensor input.


If anyone wants to start to build robots , This robot is for them, Its easy to do, No knowledge of programming is required, Just a little bit of electronics knowledge is sufficient to finish this robot.

Key Ingredients 

1x Chassis 
2x IR sensors
1x caster wheel
2x Wheels
2x  Gear Motors
1x ULN 2003 IC
4x 1.5v battery or 9v battery
1x battery snap
1x battery holder  
1x bread board
Spacers , stud and screws, and screw driver
bread board connector wires

CIRCUIT DIAGRAM


What is a line following robot?
As the name suggest this robot will follow a line either black or white line. 

What is the logic behind this?
This robot follows the logic of opaque and transparent surface, usually white surface reflects back the light and black surface absorb the light, 

How this logic can be used in line following robot?
We can use a IR sensor , Its a pair of IR transmitter and emitter, IR rays are emits by the transmitter and received by the receiver, If the surface usually white or other color will reflect back the sensor and the receiver start to receiver by this way the sensor produce 5v as output, This output can be connected to any logic circuit to drive motor or other appliance, If the sensor meets black surface there is no reflected rays , so the logic output will be 0v.


How a IR sensor Look like?

IR Sensor Circuit.


How Line Following Robot works?

This is a simple and cheap line following robot, This robot doesn't need any programming and can work without a microcontroller, hence this is a robot for a complete beginner ,

Main components of this robot is IR sensor and ULN 2003A IC

Whenever the IR sensor falls on a reflective surface or white surface it starts to give 5v as output.
ULN 2003A is a high-voltage, high- current, darlington transistor array. In this circuit it act as a switch , whenever it receives 5v as input , the output switch opens. if there is no input, switch closes.

whenever IR sensor produces 5v as output, the output pin of IR sensor is connected with the input pin of ULN 2003 IC , so the motor starts to run, if there is no output , the motor stops.


CASE 1
              When sensor 1 and 2 in white surface:

In the first case both the sensors are in white surface or reflective medium, which gives 5v as output and it drives both the left and right motors . 

CASE 2
             When sensor 1 in white surface and sensor 2 in black surface:

In this case sensor 1 is in white surface and the sensor will produce 5v as output and only one motor rotates, which makes the robot to take a turn in right side.

CASE 3
            When sensor 2 in white surface and sensor 1 in black surface
In this case sensor 2 is in white surface and the sensor will produce 5v as output and only one motor rotates, which makes the robot to take a turn in left side.


Track For LINE FOLLOWING ROBOT


We can use any track for the robot , the above one I used for the robot I made. Make sure The black line is opaque and the surface is transparent.